Importing tables using BimlScript
BimlStudio allows you to import schema and table definitions from a database, along with updating your model with the current state of the definitions at each compile. To leverage the update capability, you will need to use BimlScript to author the import logic; the BimlScript is executed during each compile, obtaining the current state of schemas and tables.
You can import database assets by following these steps:
-
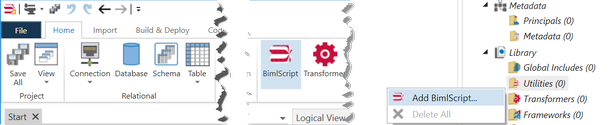
Select the Home tab in the ribbon and click the BimlScript button. You can also right click the Utilities folder and click Add BimlScript. This will open the New Item dialog, click Add.
-
This creates a BimlFile that's added in the Logical View under Library\Utilities.
-
The BimlFile should be open on the right, if not Double click on the BimlFile to open the BimlScript designer.
-
Enter your script in the BimlScript Input Editor pane. When executed, the script generates Biml for your imported assets. Clicking on the notification bar saves the script and displays the Biml, resulting from running the script, in the Preview Expanded BimlScript pane.
-
For importing assets from the AdventureWorksLT database, you can copy and paste this BimlScript into the BimlScript Input Editor pane. You can also use this sample as a starting point for writing your own import script.
<#@ template language="C#" hostspecific="True" tier#>
<# var importResult = ExternalDataAccess.GetDatabaseSchema(RootNode.DbConnections["AdventureWorksLT"], new[]{"SalesLT"}, null, ImportOptions.ExcludeForeignKey | ImportOptions.ExcludeColumnDefault | ImportOptions.ExcludeViews | ImportOptions.ExcludeIdentity);#>

<Biml xmlns="http://schemas.varigence.com/biml.xsd">
    <Schemas>
        <#=importResult.SchemaNodes.GetBiml()#>
    </Schemas>
    <Tables>
        <#=importResult.TableNodes.GetBiml()#>
    </Tables>
</Biml>
Understanding the BimlScript:
-
The first thing to notice is that all code fragments are surrounded by required
<# and #>characters. -
The first line is the required template directive. The language parameter depends on the language you're using; this example uses C#.
-
The importResult variable returns a collection of type ImportResults. The property's getter uses RootNode, which is the root of the project tree; all assets in your project can be reached from RootNode. The Connections collection returns the AdventureWorksLT connection and used by ExternalDataAccess.GetDatabaseSchema call method to perform the import.
-
Within the Biml element, the Schemas and Tables lists are populated by retrieving the SchemaNodes and TableNodes collections from the Results property and calling GetBiml, which converts the returned schema and table items into Biml.
-
To learn more about these functions, check out the Biml API documentation.
-
While writing the script, you can click on the notification bar to save the BimlScript and examine its output. The Update Preview ribbon button also refreshes the Output editor.

-
Once the output looks correct, press the Execute button in the ribbon to import the assets into your model.